
WATERCOLOR WITH GWEAKLES

I hope you’re ready for this post because it’s going to be full of colors and doodles and who doesn’t love that!
Let me start from the beginning...the company I work for hired a new graphic designer and right away she and I clicked. We both love unicorns, mermaids, and being silly at all times! So, of course, I did what any person would do and I googled her (weird? a little, but no regrets here). When I googled her name it was like hitting the Google Jackpot! Her face popped up all over google images and the whole first page were links to all her social media outlets.
“Who is this girl?!” I asked myself.
I started clicking links only to find out that she was this amazing artist by the name of Gweakles! and not just any artist, an illustrator and the medium she seemed to use the most was watercolor, my absolute favorite! After cyber stalking her I finally admitted to her that I had totally googled her and told her that she must teach me about watercolor. She agreed but in return I must teach her how to mermaid!
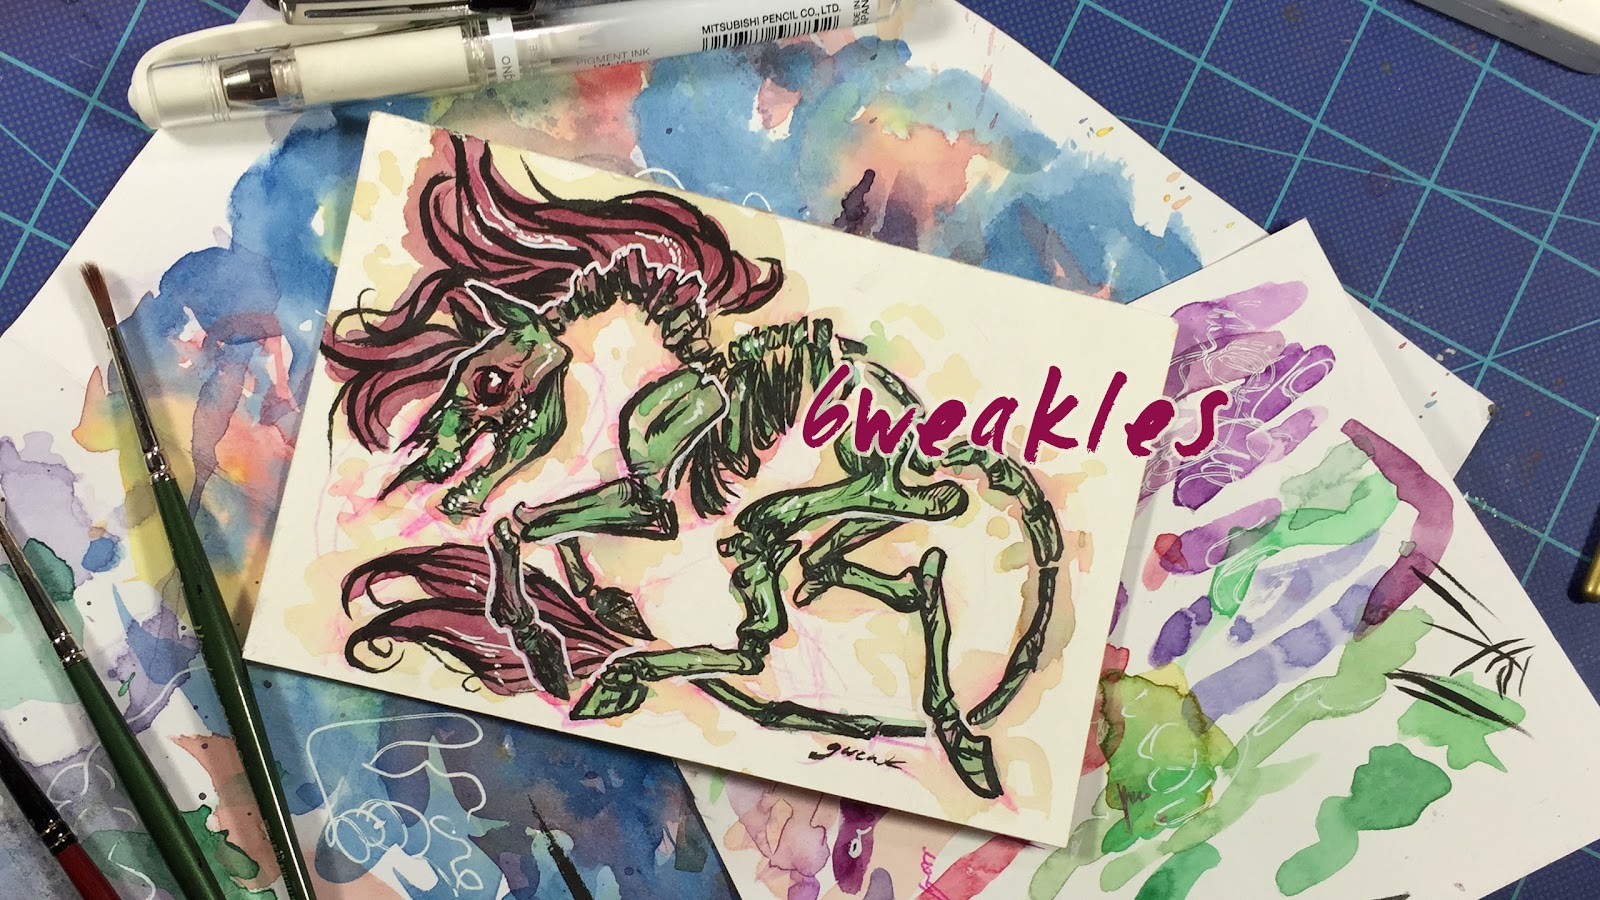
A few days later I had got her a pack of plastic dinosaurs to decorate her desk and she loved them so much she drew me the most amazing picture:

IS THAT NOT THE BEST THING YOU’VE EVER SEEN?!
Seeing that Frozen and Mermaids pretty much rule my world, I was pretty excited to get an Elsa Mermaid illustration from her!
Fast forward to a week later and we had finally set a date to get our watercolor on! So, this post is all about the knowledge I took from my lesson in watercolor with Gweakles. I had never really painted with watercolor in the way that she does so I was really excited to hear anything she was willing to tell me.
Shall we begin?

[1] Watercolor Paper-At least 140lb
[2] Paint Tray for mixing colors
[3] Paper towel or washcloth for drying off your brushes
[4] Prismacolor Col-Erase pencils (Rose is Gweakles’ favorite!)
These are good if you want to layout your drawing first
[5] Paint Brushes-Round Synthetic in 2, 4, 6, 10
[6] Kneaded Eraser- For picking up those layout lines
[7] A piece of test watercolor paper for testing your color before
putting it down on your drawing
Not shown but VERY important:
[8] Watercolor (DUH!)
[9] A glass of clean water

Now my piece of watermelon is no Gweakles illustration but I'm proud of it! I was able to create this simple water doodle with a few pointers she shared with me and I now will share them with you because I'm awesome like that. You're Welcome. I was also able to get Gweakles to answer a few questions about her own personal taste on all things watercolor. So, You're double welcome.
[1] WATERCOLOR
You have 2 options here: Tubes or Pan Set?
Tube- You add your paint and create your palette as you see fit!
Pan Set- Dry watercolor with a set palette.
MTG: What brand of watercolor do you use?
Gweakles: My paints come from cute little tubies, usually Utrecht brand or
Winsor and Newton (when I’m lucky enough to get them on sale ;P).
MTG: Do you prefer tubes or pan sets?
Gweakles: I’m not particularly picky. I’ll have to say tubes
because I get to portion it out!
[2] LESS IS MORE
The best part of working with watercolor is that you can reactivate dried up watercolor in your mixing tray just by adding water.
MTG: You must go through a lot of watercolor!
How long does your watercolor usually last?
Gweakles: A very long time! For example, I still am using the tubes I bought in college--not to sound like an old lady or anything >_>; but, um, that was four years ago.
MTG: Since a little bit can go a long way, how much wet watercolor
do you put down to start with?
Gweakles: Usually I squeeze out just a little drippy drop out at a time.
A little goes a long way with pigment!
[3] SIMPLE WATER
Water is everything when it comes to watercolor! You add water to activate the watercolor and the amount of water you add makes a difference.
It's simple:
More water = Lighter pigments
Less Water = Darker Pigments
The best part is that if you add too much water and the pigment is too light you can add more paint and vice versa.
MTG: I love everything about your illustrations, but one of my favorite things is how vibrant and pastel like your colors are! I didn't even know vibrant pastel was a thing! How do you get your colors to pop like that?
Gweakles: LOL Thank you so much! It’s all the watercolors, not me. Achieving brighter colors is all about mixing the right amount of pigment in your washes. When it comes to pastel vs. vibrance, I make sure that though I lay down lighter washes, I layer them with complementing colors to achieve optimum color pop!
MTG: Another one of my favorite things is your use of white gel pen. How do you decide where the gel pen should be used?
Gweakles: Through a lot of trial and error actually. At first I was only using it to show highlights in eyes and hair, then I used it to outline my figures, and after studying my work more carefully I decided I think it looks best when it’s not used in excess. So now I use it for minor highlights and to show depth--if one shape is in front of the other.
[4] WET INTO WET
That's watercolor talk for putting clean water down on the paper first and then adding your wet paintbrush with pigment on it.
Just follow these steps for wet into wet painting:
[1] Mix paint you want to use and get it ready to be used
[2] Clean your paint brush
[3] Take your clean paintbrush and add it to water
[4] Take the wet paintbrush and wet the paper in the area that you are adding color to
[5] Clean your paintbrush
[6] Pick up the color you got ready with your paint brush
[7] Add it to the space you wet in step 4
Ta-Dah! Easy.
Wet into wet painting is good for creating gradients and covering large surfaces.
There is also Wet into dry which is like wet into wet except you don't wet the paper before hand. You just get your paintbrush nice and wet with your choice of color and go for it on the dry watercolor paper.
MTG: Any other important basic watercolor terms you
would like to share with these lovely readers?
Gweakles: Oh snap, on the spot my head is turning into a dry sponge.
UMMM. Texture? TEXTUREEEE (ノ◕ヮ◕)ノ
MTG: What is your favorite way to start painting an
illustration after you lay it out?
Gweakles: My favorite way would probably be to go HAM on my favorite
color--note the ridiculous usage of purple--BUT I usually start with the lightest
color and work my way to the darkest. If I can contain myself.
[5] LAYERING
You can see in Gweakles illustrations that she layers colors. For examples in the Mermaid Elsa illustration she layers the purple over the blue in the tail.
What I got out of our quick lesson about layering was that the key to layering is patience.
Waiting for the first layer of paint to dry and then adding your second layer of color.
MTG: You mentioned to me that I could use a blow dryer if I just couldn't wait for it to dry, but also mentioned to be careful because if it’s too wet it may move and give a splatter look. In your opinion, does it make a difference if you use a blow dryer over letting it dry naturally?
Gweakles: I consider this all the time, especially when I’m on a tight deadline and need to use the blowdryer to get something done. It may dry out your pigment (which just means to keep it on a cooler setting and keep the blowdryer further from your paper). But I’ve never really noticed a large difference...I may have to do a serious experiment now because this will bother me, lol.
MTG: Now that the post is coming to an end is there any
extra watercolor knowledge or advice you want to drop on us?
Gweakles: Be patient and experiment! All the best things come from experimenting,
stepping back, figuring out what you like and what you don’t like,
and growing from there. Also, have I mentioned how fun texture is?
Texture is just, the best. Texture and texture some more please and thank you!
Thank You, Gweakles for taking time out of your schedule to teach me about watercolor! I'm excited to practice with the watercolor pan set you gave me!
YouTube Facebook Instagram Twitter Her Store
Well, that's all I have for you! I'm sad to see this post end but happy to get started on the next one! A Watercolor DIY will be a blog for another day. Stay Tuned!
Blog Song: Tidal Wave- Sub Focus


4 comments
This came out amazing! Thank you for featuring me and my work, I can't WAIT to see what other adorable creations you make with watercolor--your watermelon looks so delicious *^*
ReplyDeleteThank you so much! So happy that we were able to work on this together! I hope we get to work together again soon!
DeleteExcellent post, your watermelon is adorable.
ReplyDeleteThank You!!
Delete